Ford Falcon XR: Reader resto
 Ford Falcon XR

 Ford Falcon XR

 Ford Falcon XR

 Ford Falcon XR

 Ford Falcon XR

 Ford Falcon XR

 Ford Falcon XR

 Ford Falcon XR

 Ford Falcon XR

 Ford Falcon XR

 Ford Falcon XR

 Ford Falcon XR

 Ford Falcon XR

|
|
|
Ford Falcon XR
|
|
|
|
Ford Falcon XR
|
|
|
|
Ford Falcon XR
|
|
|
|
Ford Falcon XR
|
|
|
|
Ford Falcon XR
|
|
|
|
Ford Falcon XR
|
|
|
|
Ford Falcon XR
|
|
|
|
Ford Falcon XR
|
|
|
|
Ford Falcon XR
|
|
|
|
Ford Falcon XR
|
|
|
|
Ford Falcon XR
|
|
|
|
Ford Falcon XR
|
|
|
|
Ford Falcon XR
|
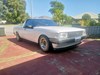
Peter Davis' persistence paid, but there was a world of pain under that paint!

|
|
Reader resto: Ford Falcon XR
|
Ford Falcon XR
XR-LENT
From the first time I laid eyes on an XR GT as a fourth year apprentice, I knew I had to have one. I finally realised that dream in September 2010.
My car was originally purchased in Brisbane and, according to the owner of 25 years, needed a ‘respray and some minor rust repairs’. The car had been previously displayed at car shows, allegedly.
To work. A friend had a workshop at West Gosford and the resto began there.
The truth was realised after the paint was removed. Oh dear. There was not a panel that did not have a layer of bog, and when that was removed, there was extensive rust and old repairs evident all over the shop. In fact, the left hand front guard filler was 11mm deep at the front! The right hand rear quarter panel had been replaced very early in the car’s life but the finish of the welds was terrible. Still, we persevered.
After removing the body panels, the interior was stripped. The dash and gauges were dismantled and the dash surround was yellowed with age. This was sent to Grand Tourer in Melbourne for rechroming, while the gauges went off to Namiiss Gauges in Newcastle for the calibration check and full refurbishment.
When the front guards were removed, it was clear that the vehicle had sustained a severe front impact. While the rails and engine bay measured perfectly, the dents had never been repaired. More delay.
The bonnet and doors turned out to be too far gone to repair, so new or good second-hand panels were sourced. During this time door skins became unobtainable and new door shells had to be purchased at $695 each. This should have been an easy, prime and paint job. But there was far more than that involved, as is often the case in a restoration like this.
Yep, take nothing for granted as things often fail to go to plan. Here’s a good example. Obviously my car is an XR, but the available new door shells are XT to XY. XRs have a lever type door release, and XT, XW and XY have a grip release. The door handle release sections had to be cut from the old doors and welded into the new shells. Bother.
A bonnet was located in Taree for $200, and new door shells were purchased from GT Supplies in Brisbane.
The body shell was sent to Steve Kennedy Smash Repairs in Toukley to have older damage to the turret, left hand quarter panel and plenum repaired. Scott also had to make up both left and right hand dog legs and rear sill sections because they were virtually non-existent after the bog was removed. The total cost of this exercise was $3000 and the finished product was excellent. Money well-spent right there.
The front seats were sent away to be repadded at a cost of $200 and a complete rubber and seal kit was ordered through Morcom’s Panel.
While the panel work was being carried out, we decided to replace some leaking engine gaskets and repaint the engine which was in the wrong colour. Upon removing the gearbox, we found the clutch was worn down through the rivets and the flywheel had an array of purple burn marks. I actually went over the body looking for roll cage mounts, but none were found.
During this time, the dash had come back and looked better than new, the instruments were refurbished and the seats had been repacked.
As the front end had been re-bushed prior to purchasing, the suspension was not in need of too much attention. Until I noticed the camber adjusting bolts had been fitted upside down! Just another thing to fix due to poor workmanship.
The body was assembled and taken to Adams Smash Repairs where Marty did all the preparation and painting. The finished product is excellent and has been commented on several times at various shows.
Reassembling was slow and tedious, but, I hope you agree, worthwhile.
KERCHING!
So, what was the damage?
Body repairs: $3000
Door shells: $695each
Dash rechrome: $600
Seal kits etc $1000 approx
Bonnet: $200
Paint materials: $800
Clutch: $600
Dual exhaust: $600
Instrument repair: $550
Thanks to:
Grand Tourer,
Steve Kennedy Smash,
Namiiss Gauges.
Dennis, Marty, Brett and Scott for their tireless support.
XR PARTS PRICES
Boot side boards screw set
$9.55
Panel MDF kit quarter to boot
$34.30
Engine mounting
$36.00
Speedo gear (drive)
$55.00
Panel rear window
$186.75
Parts resources
rarespares.net.au
grandtourer.com.au
falcongt.com.au
gtshop.com.au
*****
More reviews:
> Buyers guide: Ford Falcon XR/XT GT
> Bathurst legends - Ford Falcon XR GT
> USA vs Oz: Mustang vs Falcon XR
Search used:
>> Search Ford Falcons for sale
Unique Cars magazine Value Guides
Sell your car for free right here
.jpg)
Get your monthly fix of news, reviews and stories on the greatest cars and minds in the automotive world.
Subscribe


![2005 FORD FALCON BF XR8 Sedan 4dr Spts Auto 6sp, 5.4i [Oct]](http://assets.primecreative.com.au/imagegen/cr/100/75/assets/momoads/2024/08/20/231723/307_1.jpg)